

Interactive Binders!
- Jun 25, 2017
- 3 min read
Those of you that are teachers will know that Interactive Notebooks have been the "in" thing for a few years now. Students have a composition notebook that they paste in flaps, pockets, doors, and tabs to use as notes. Watching teachers spend hours making the inserts and cut outs and then spending valuable class time putting them in has put me off them for the time being. Don't be discouraged, though, because I discovered an idea from an awarding winning teacher that has made my life so much easier!
I was lucky to be placed with two FANTASTIC women as coordinating teachers during my time student teaching. During the two eight-week sessions I learned so much about teaching, my brain was on overload. One thing that I loved from my second placement, was the class binders she used. Each student had a one-inch, three-ring binder that held all of their worksheets, notes, study guides, and resources. It was like a dream come true all organized into five simple flaps.
Two years later and in my second year of teaching, I decided to try out this ingenious idea and it worked phenomenally! Below are pictures of the pages I used and how I organized my "Blue Binders" for students last year. Hope you are as inspired as I was!

This is the binder that I kept as a "key" for my students. So, if they were absent or got things mixed around in their binder, they could check mine and reorganize theirs.
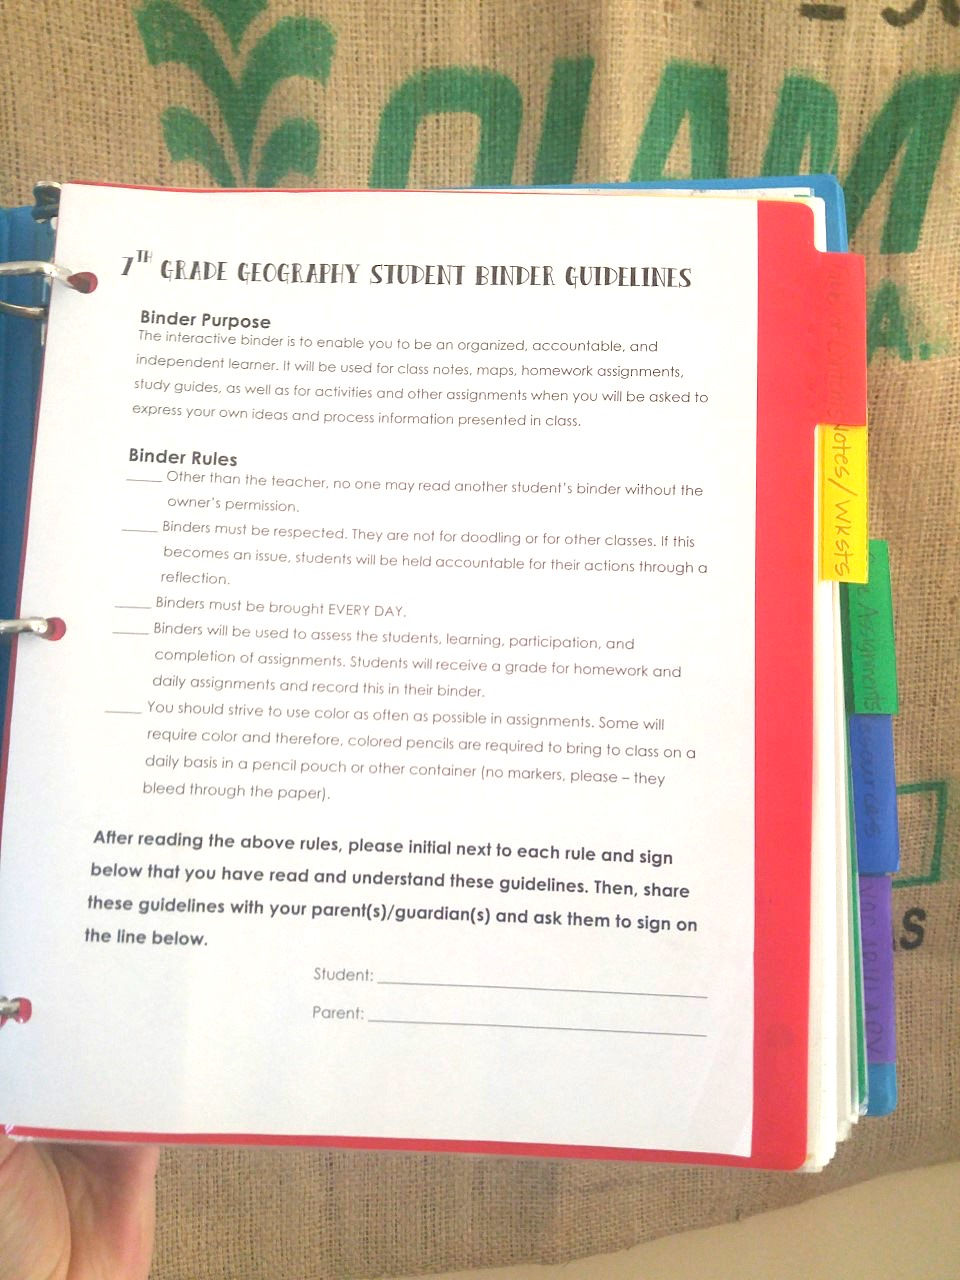
The second day of class, we organized the binders as a class and at the end of class, we read through the Binder Rules. Students had to have their parents sign the guidelines and bring them back by the end of the week. This was a good back up when students claimed they "didn't know" about certain rules, too.

The first tab is the Table of Contents. This has all of the notes, worksheets, foldables, and readings we do in class. They are listed by the date they are handed out and include the assignment name, page #'s and the check mark at the end is to show that they are "finished".

This is an example of the notes pages. As you can see, the pages are numbered, which make them easy to locate. The page on the right is actually a foldable we did. I just had the printer three-hole-punch the pages before we cut them.

After the notes pages, the next tab is for Core Assignments. These are "worksheet" that assess student knowledge of the standards we are covering at the time. These are not put in as a grade as of this point because we are not Standards based yet, but eventually I would like to use them for grading purposes.

The next tab is for resources. We keep things like the time partners sheet, study guides, and the grammar cheat sheet in this tab.
The time partner sheet is nothing new - the first week, I take a day (Yes, for 7th graders, it takes a whole day!), where students go around and find a partner for each time slot. Take some chill pills and a couple deep breaths before this one, but I promise it helps out in the end. I love that it gets partners together quickly, and forces students who wouldn't normally be partners to work together.
Below is a picture of the grammar cheat sheet and a study guide.


Lastly, the vocabulary sheet ends the binder. I didn't use this as much as I should have last year. I am going to keep it, but I making a pledge right now to use it as I had originally planned. Many times while I'm lecturing, students will ask me about words that I use and what they mean. I would always tell them, but this is one way that I can push for them to remember the word and put into a phrase they might use!
If you have any questions about the binder or want the pages, please ask and I would be happy to upload them or send them to you!
Thanks for reading!


Comments